


A decent heater can transform winter sailing. Graham Snook finds out how the professionals go about installing a boat heater

Installing a boat heater
Winter is an ideal time to have a boat heater installed. It can make chilly mornings a thing of the past, with the promise of snug evenings aboard in a deserted anchorage. And if you’ve laid your boat up for the winter, stripping out cushions and equipment, it will make installing a heater a lot easier.
Choosing a heater depends on the size of your boat and your budget. ‘It’s better to have a small heater working hard than a big one ticking over that can coke up, like an idle diesel engine,’ said Toby Hague from Keto Marine, a company approved by Webasto, who installed this heater.
Installing a heater means a lot of work in confined spaces, it involves some unusual tools you probably don’t have, and a badly-installed heater can kill you. Any one of those is good enough reason to get a professional, approved by your heater’s manufacturer, to install it for you.
Where to install?
Before you start, always think about the route of the ducting
The prime consideration is the ducting route. Where do you want heat? Is there enough space for the installer to work? Ideally, ducting holes should be cut through wooden panels rather than the GRP frames. Not only is drilling easier but, more importantly, you won’t compromise the internal structure of the boat.
The ducting route defines where the heater can be fitted. Some heaters – though not this Webasto Air Top 2000S – specifically need to be mounted horizontally or vertically. Fitting your heater close to the fuel tank and batteries will make life easier and Toby made sure the heater’s location allowed ducting runs without sharp angles – every 90° bend loses 5% of the heat.
Finally, think about the exhaust outlet. If you stow fenders on the pushpit, an exhaust outlet there will melt them in seconds. And remember, there needs to be space for a swan neck on the exhaust, to prevent water entering the heater.

Another winter boat test, this time a Najad 410 in Sweden with a F7 outside. A tent and a cockpit heater outlet turned it into a second saloon
On this boat Toby chose the spacious transom, then ran the aluminium ducting forward under the aft bunk, splitting the air into three vents: the heads, the aft cabin, and the furthest vent in the main saloon. If the boat has a cockpit tent, an outlet in the cockpit makes a big difference to life onboard in winter.
Installing the heater
The aft cabin vent is screwed securely into place
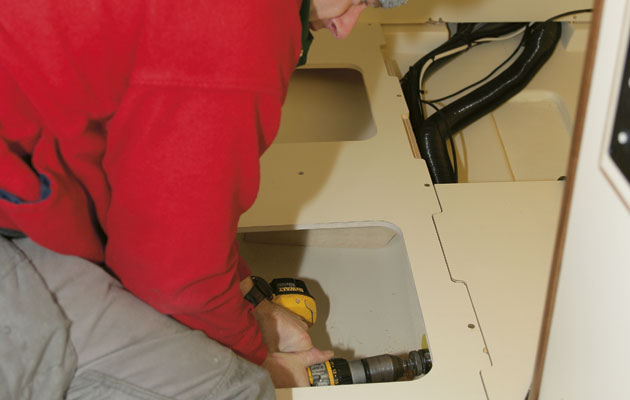
Fitting the heater unit itself was a simple matter of four screws into the inner liner. Toby then ran ducting under the space in the aft bunk. 60mm (3in) holes were drilled near the upper edge of each partition through which the ducting would run. The holes were angled, so the ducting ran smoothly from one locker to the next.

Angling the ducting holes means fewer bends and greater efficiency
To get to the saloon vent, the ducting was run down the starboard side behind the galley and under the saloon bunk. It is good practice to run the ducting along the upper edge of lockers to prevent it from being crushed by heavy items while sailing.

Having the right tools for the job makes working in tight spaces easier
Some boatbuilders, Legend in this case, clearly expect some owners to retro-fit heating, as holes in the tightest places were pre-cut at the factory. Having drilled a total of six holes for the ducting, it was time to place the vents. Toby always drills through from the visible side to prevent damaging the veneer.

Cover all the ducting with sleeves of Thermoduct insulation to make sure you’re heating cabins, not lockers
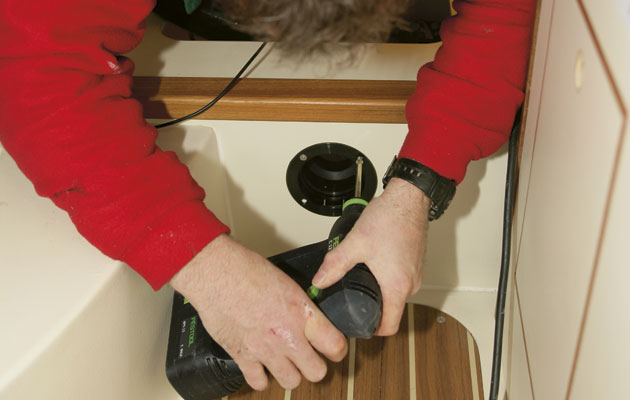
The Webasto’s thermostat and control wiring were threaded through the new holes before the ducting. The dial control can be fitted anywhere the wiring will allow, but the ever-thoughtful Toby placed it in the aft cabin, so the owners can switch the heating on and off without having to leave the comfort of a warm bunk.

Cover the loose end of the ducting to stop it tearing the insulation
Working back from the loose end, Toby covered the ducting with a plastic bag to stop its rough edges tearing the Thermoduct insulation, then inserted two sleeves of insulation over the ducting. The plastic vent was attached to the aft bunk-front with four screws and the fascia clipped in position. The rear of the vent was attached with a short length of ducting, cut with a kitchen knife and insulated as above, to the Y connector.

The first Y connector splits the heads heating, to port, from the aft cabin and saloon heating, to starboard
With one vent finished, Toby installed the thermostat in a discreet area in the galley. Back under the cockpit, he connected the heater to the battery. The control dial flashed ‘no fuel’ as expected. The fuse was removed and Toby returned to the heads ducting. ‘I like to fit the vent so it heats up the seat,’ grins Toby, but unfortunately the bunk level on the this boat is too low to allow this.
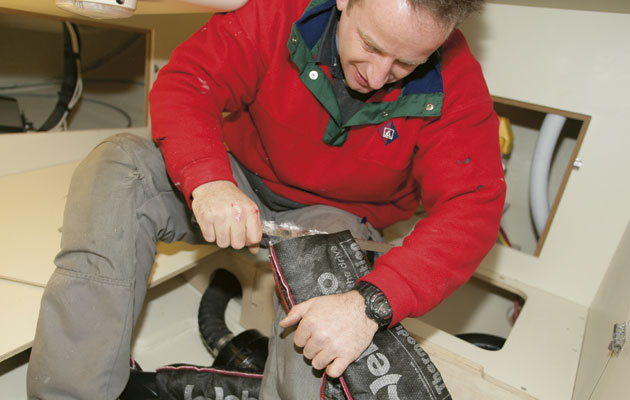
Using a kitchen knife to cut the Thermoduct is quick and easy
After deciding on the heads vent location, he drilled a pilot hole with a right-angle cordless drill to make sure the hole wouldn’t damage anything or be seen in the aft cabin, then drilled the 60mm (3in) vent hole.
The fuel system

Scoring the pipe before snapping it keeps its shape
After clearing up the sawdust, it was time to work on the fuel system. The heater uses a solenoid fuel pump so a lift pipe had to be fitted to the tank. To reduce the risk of debris entering the tank, Toby used a vacuum cleaner while drilling: ‘Some dirt is unavoidable, but the engine has filters and the heater pump isn’t powerful enough to suck up the debris.’
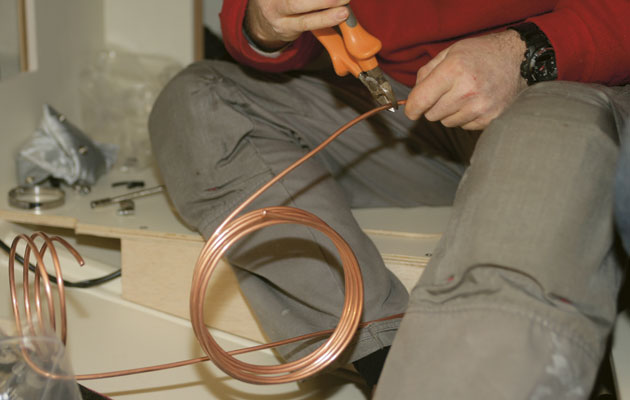
Toby bent two spirals into the fuel supply pipe before starting the second
As the pump can’t lift beyond 1m (3ft 3in), he lined up the lift pipe and tank, then scored and snapped the copper pipe before gently bending it to attach to the pump, allowing two spirals in the pipe to compensate for vibration. A second pipe, running from heater to pump, got the same treatment.
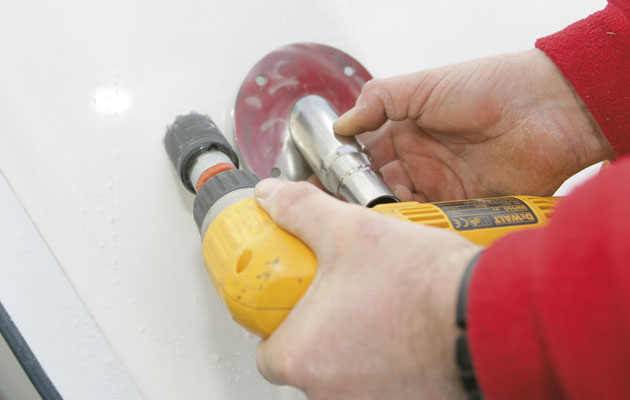
To get the angle right, place the exhaust fitting against the transom and align the drill with the exhaust pipe
Back to the exhaust system, Toby ran a protective sleeve over the stainless steel exhaust tube and bent a swan neck at the top, He drilled a pilot hole in the transom and once sure it was in the right place, took the exhaust fitting outside and placed it against the transom to gauge the right angle for the hole. Using a grinding-toothed hole-cutter to prevent the gelcoat cracking, and enough marine sealant to ensure a watertight fit, Toby bolted the skin fitting in place.

Self-etching marine sealant was applied to the exhaust fitting
Back in the transom, the exhaust was attached and cut to fit. A short air inlet pipe was attached to the heater to allow diesel combustion.

A protective sleeve covers the exhaust pipe
The switch was flicked and after five hours, I heard the familiar click of the heater firing up. ‘Not all installations are this easy,’ said Toby. ‘Usually a boat of this size takes around seven hours.’
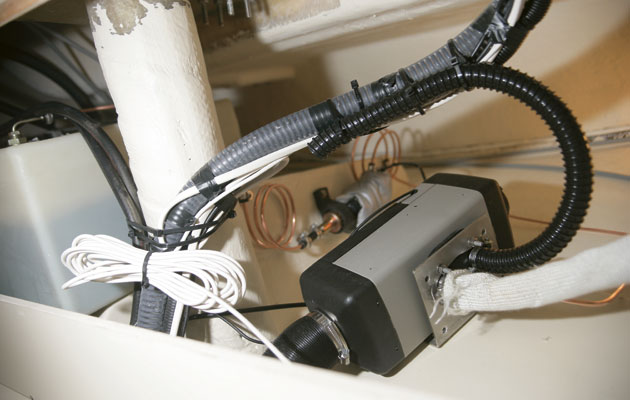
L-R: The fuel tank, the copper input and output to the fuel pump and the heater, all in place and ready to give warmth

Toby Hague, Keto Marine
Thanks to Toby Hague at Keto Marine (Tel: (01489) 583000; Email: sales@keto.co.uk) and Webasto (www.webasto.co.uk).